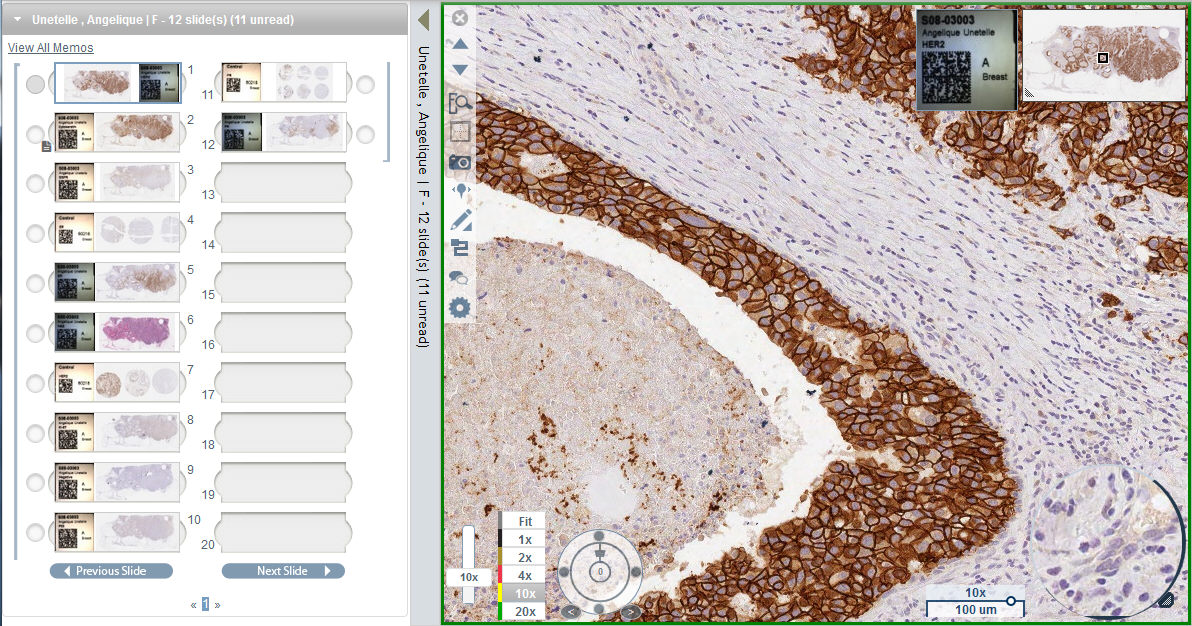
eSlide Tray
Viewer Window
You use the WebViewer to view and annotate eSlides. See the following quick reference topics for more information:
For detailed instructions about the WebViewer, see the eSlide Manager Operator's Guide.
When you open one or more eSlides from eSlide Manager, they appear in the WebViewer:
|
|
eSlide Tray |
Viewer Window |
The eSlide Tray contains all of the eSlides you opened.
The Viewer Window is where you view and navigate eSlides.
You can perform these tasks in the eSlide Tray:
To do this: |
Follow these steps: |
View an eSlide. |
From the eSlide Tray, click an eSlide to open it in the Viewer window. |
Flip an eSlide horizontally to mark it as read or unread. |
Right-click an eSlide and select Toggle Read/Unread. |
Navigate through the eSlides. |
Click the Previous Slide and Next Slide buttons. |
Navigate through all open eSlide trays. |
If
there is more than one tray, click the left and right arrows |
Move an eSlide to a different slot in the tray. |
Drag the eSlide to a different position within the same specimen group. |
Insert a blank slot in the eSlide tray. |
Right-click the eSlide that is below the space where you want an extra slot and select Insert Blank Slot. |
Remove an eSlide from the eSlide tray. |
With one or more eSlides selected, right-click one of the selected eSlides and select Remove Selected Slide(s). |
Collapse the eSlide Tray to expand the Viewer window. |
Click the blue bar located between the eSlide Tray and the Viewer window. |
Select multiple images to view. |
Select the circle next to the eSlide to open the eSlide image in the Viewer window. |
You access the following tools and settings from the toolbar.
Note: Depending on your user permissions, some tools may not appear in your version of WebViewer.
Use this tool: |
To do this: |
|
If multiple eSlides are open, click to close the active eSlide. |
|
View the previous eSlide in the tray. |
|
View the next eSlide in the tray. |
|
Open the eSlide in ImageScope. |
|
If multiple eSlides are open, change the image tiling pattern. |
|
Print the eSlide as it appears in the Viewer window. |
|
Open the Pin drop navigation tool. |
|
Add or edit annotation. |
|
Use the Raster Scan navigation feature. |
|
Host a conference to share eSlides with colleagues working in your eSlide Manager location. |
|
Open the WebViewer Visibility panel and Options window. |
Use this tool: |
To do this: |
|
In the Viewer window, drag your mouse pointer to pan around the active eSlide. |
|
Use the arrow keys to move up, down, left, and right. To move a greater distance, press Shift and an arrow key. |
|
Point to an edge of the Viewer window. When a highlighted bar appears, click it to start Auto-Pan. The Auto-Pan symbol Click anywhere in the Viewer window to stop the auto-pan. |
|
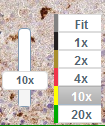
The Zoom Slider (on the left) enables you to zoom in and out of the eSlide. The Zoom Control (on the right) enables you to select a specific magnification. |
|
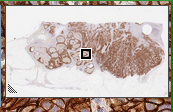
The Thumbnail is a small version of the eSlide. Click the Thumbnail to view the corresponding area in the Viewer window. The small navigation box inside the Thumbnail represents the area currently shown in the Viewer window. Drag this box to move around the eSlide. |
|
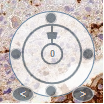
Drag the bar around the Rotation Dial to rotate the eSlide from 0° to 360° by dragging the bar around the dial. |
|
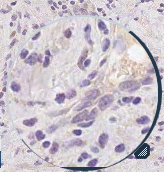
Use the Magnifier Glass to view areas of the eSlide at twice the current magnification. |
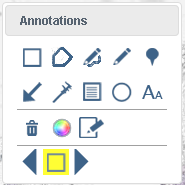
Click the Annotation tool ![]() to open the Annotations box.
to open the Annotations box.
Use this tool: |
To do this: |
|
Draw a square. |
|
Draw a polygon. Click to set points, and then double-click to complete the polygon. |
|
Draw a free-form shape annotation. |
|
Add a pin drop annotation. |
|
Draw an arrow annotation. |
|
Measure the length of an area. Click to set points and then double-click to complete the measurement. |
|
Define the report image. |
|
Draw a circle annotation. |
|
Add a text label. |
Use this tool: |
To do this: |
|
Delete the selected annotation. |
|
Change the annotation color. |
|
Add or edit notes for selected annotation. |
|
Use the right and left arrows to go to the next and previous annotations. |
If there are annotations on the eSlide, you can access additional annotation tools by right-clicking to open the shortcut toolbar.
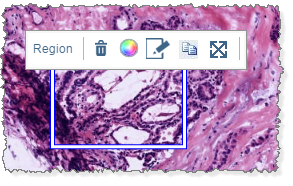
Use this tool: |
To do this: |
|
Copy the selected annotation. Click to copy the annotation, and then right-click to paste it in the new location. |
|
Move the selected annotation. Click to cut the annotation, and then right-click to paste it in the new location. |
|
Edit a free-form annotation. Point to the annotation, and drag the pointer to redraw the shape. Release the mouse button when you are finished drawing. |
Return to the top of the page.
 .
.